Follow Me On Social Media!
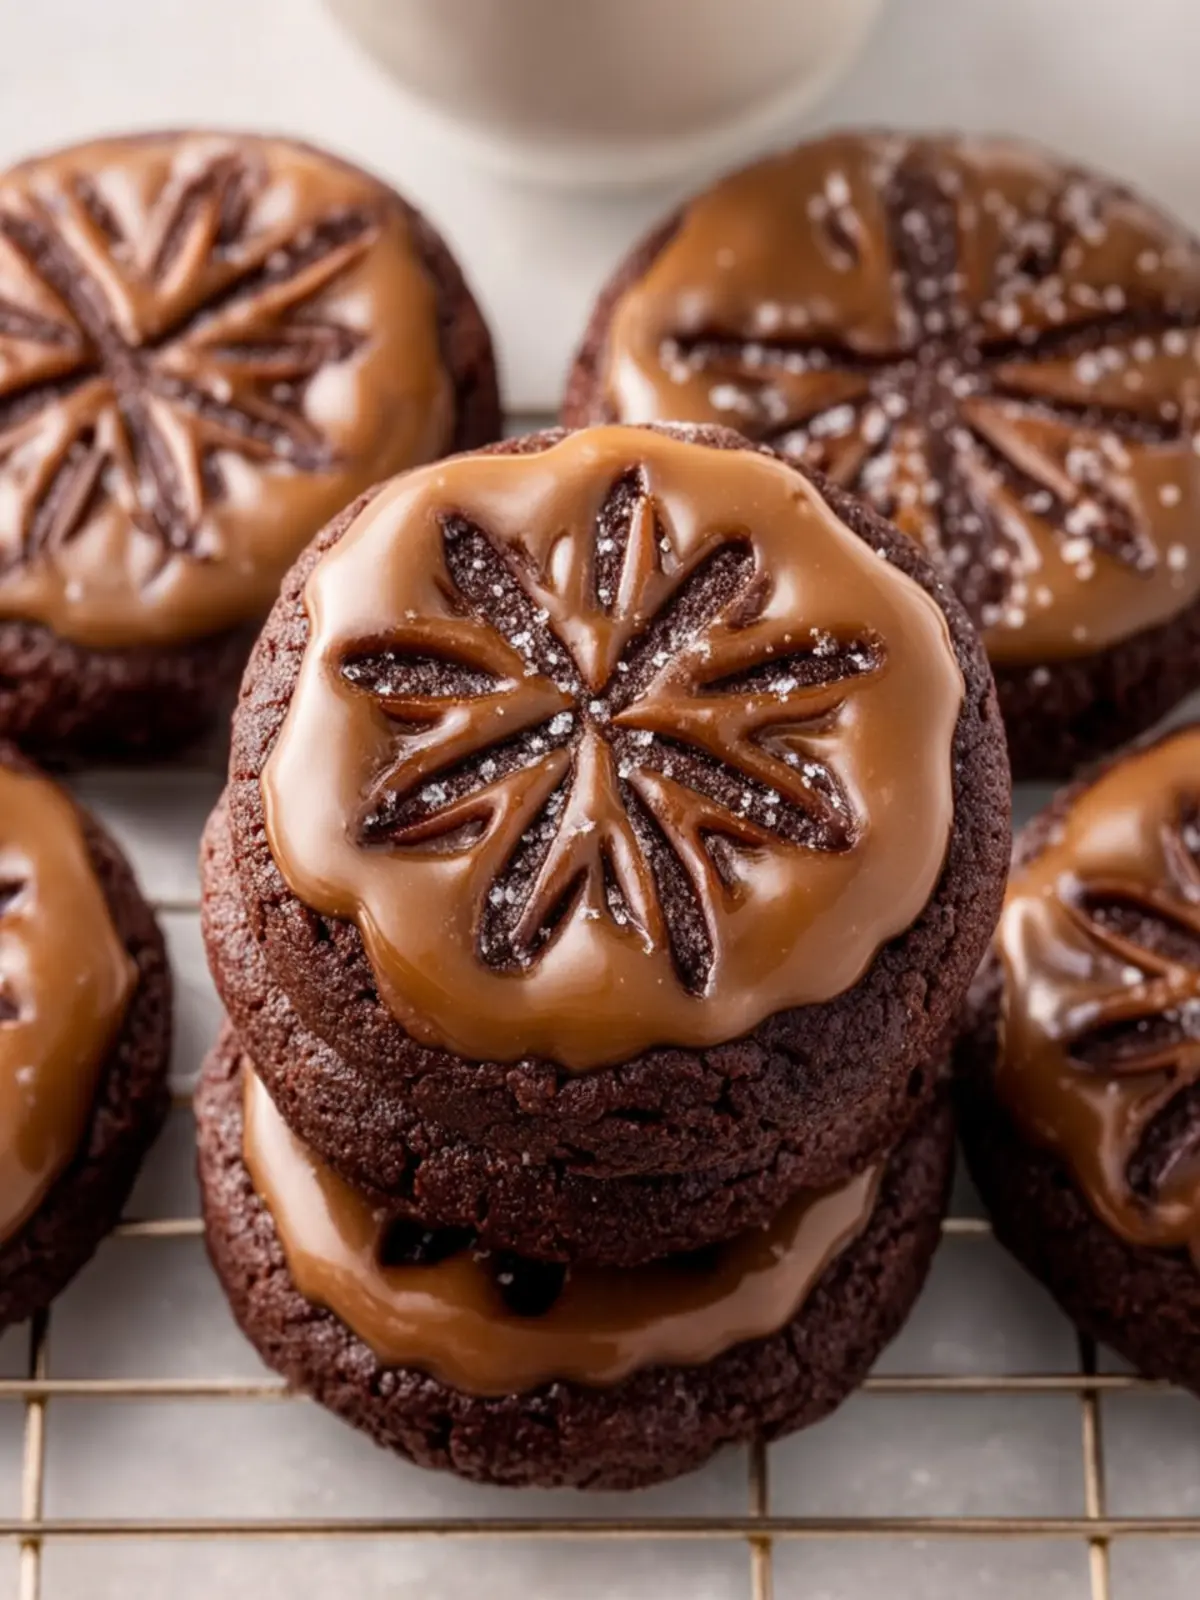
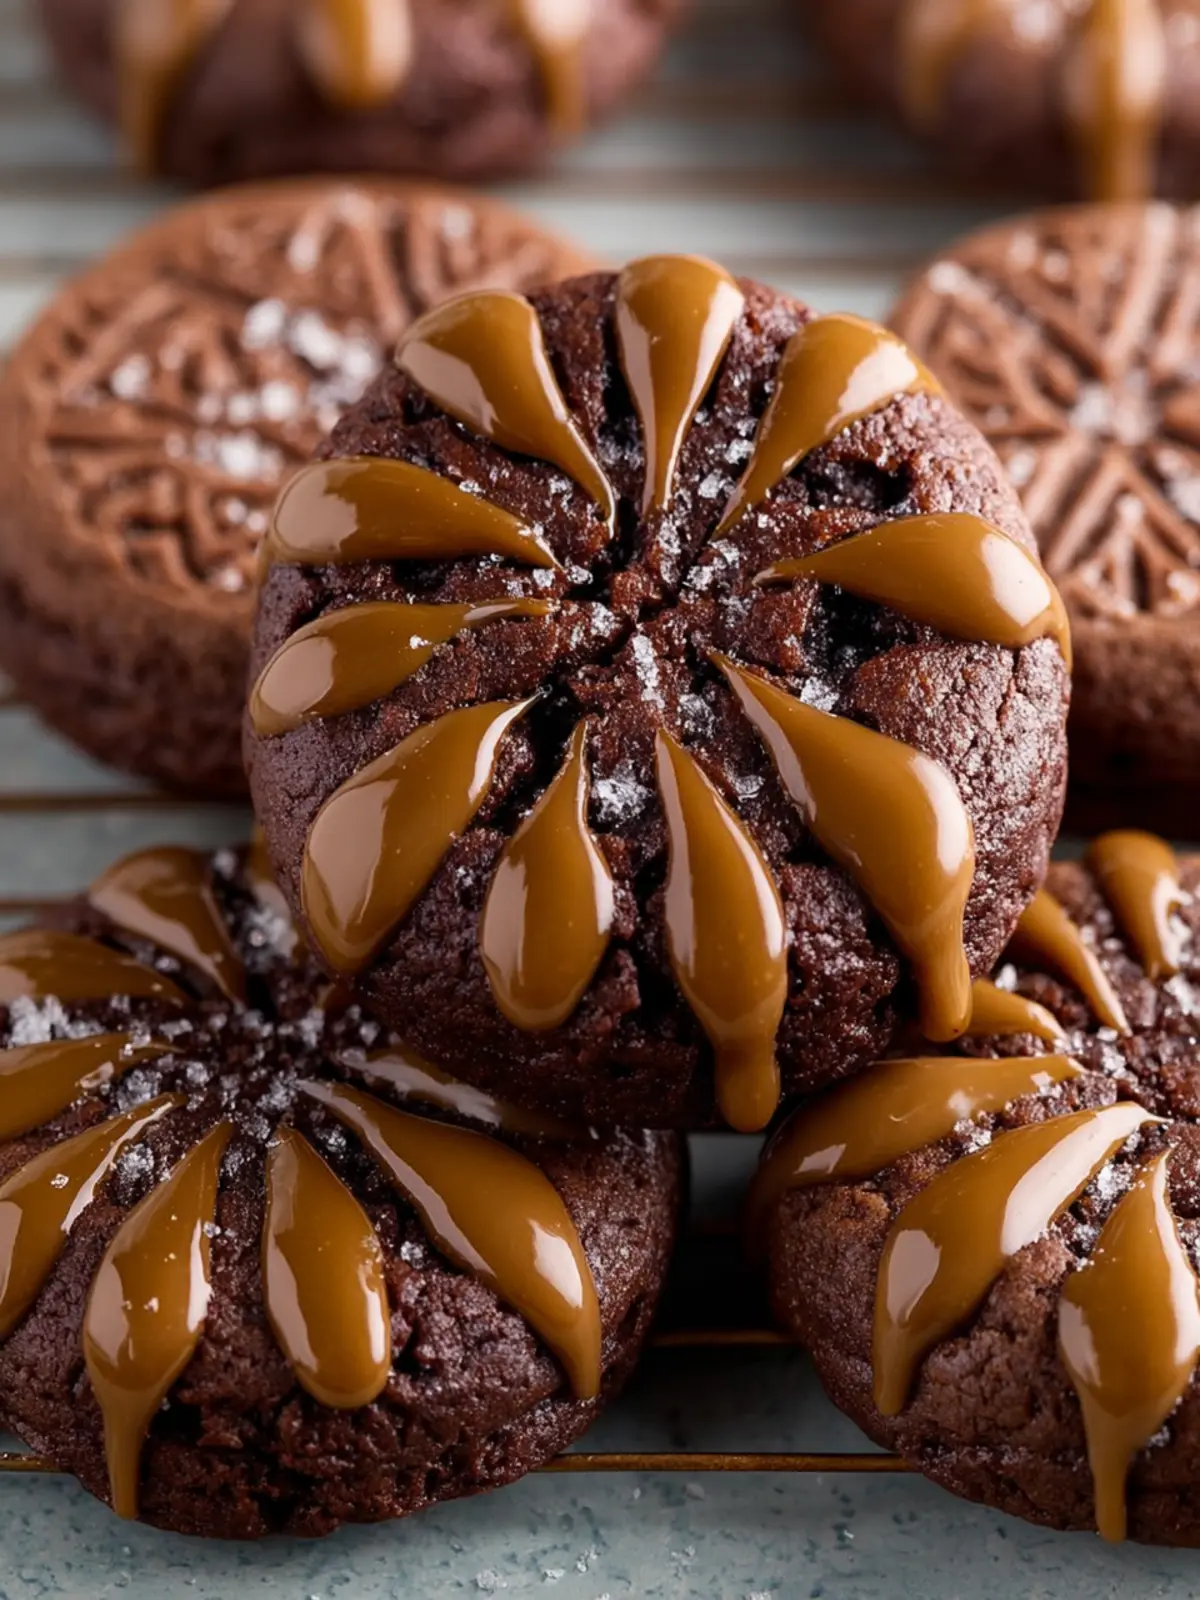
Stamped Chocolate Espresso Cookies That Will Change Your Life
Introduction to Stamped Chocolate Espresso Cookies
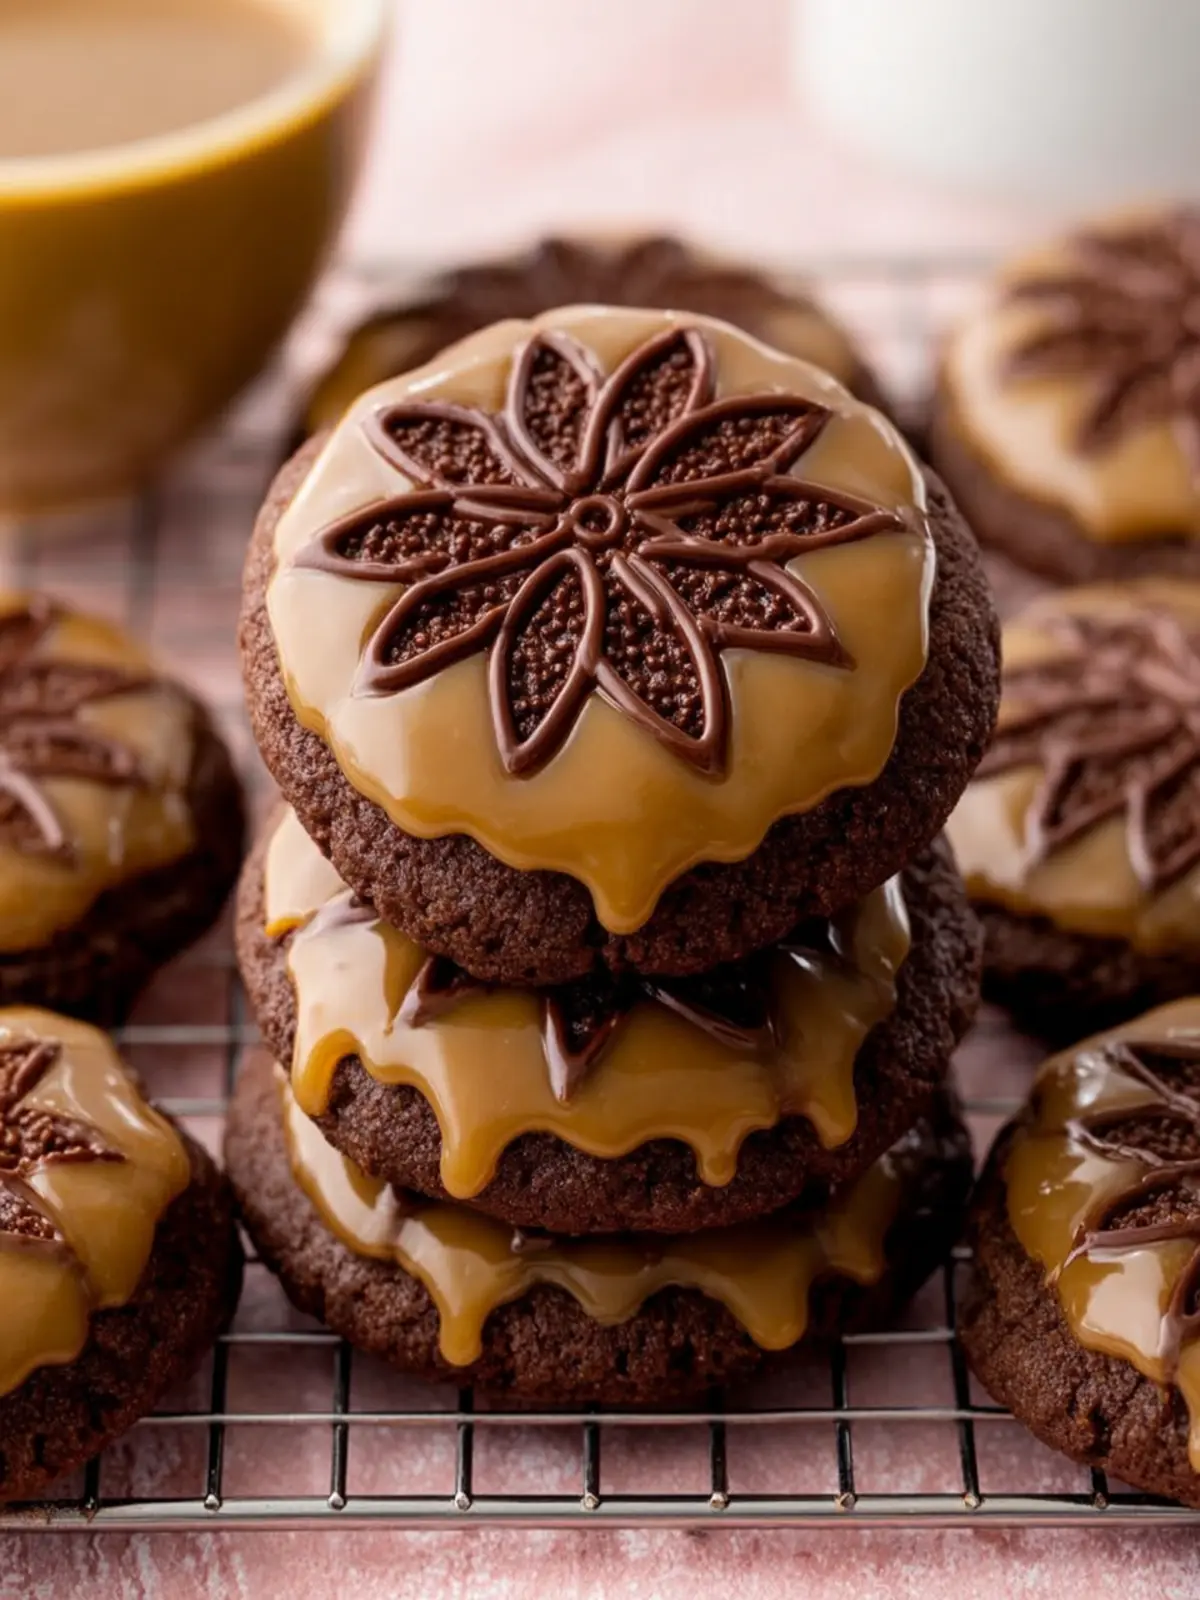
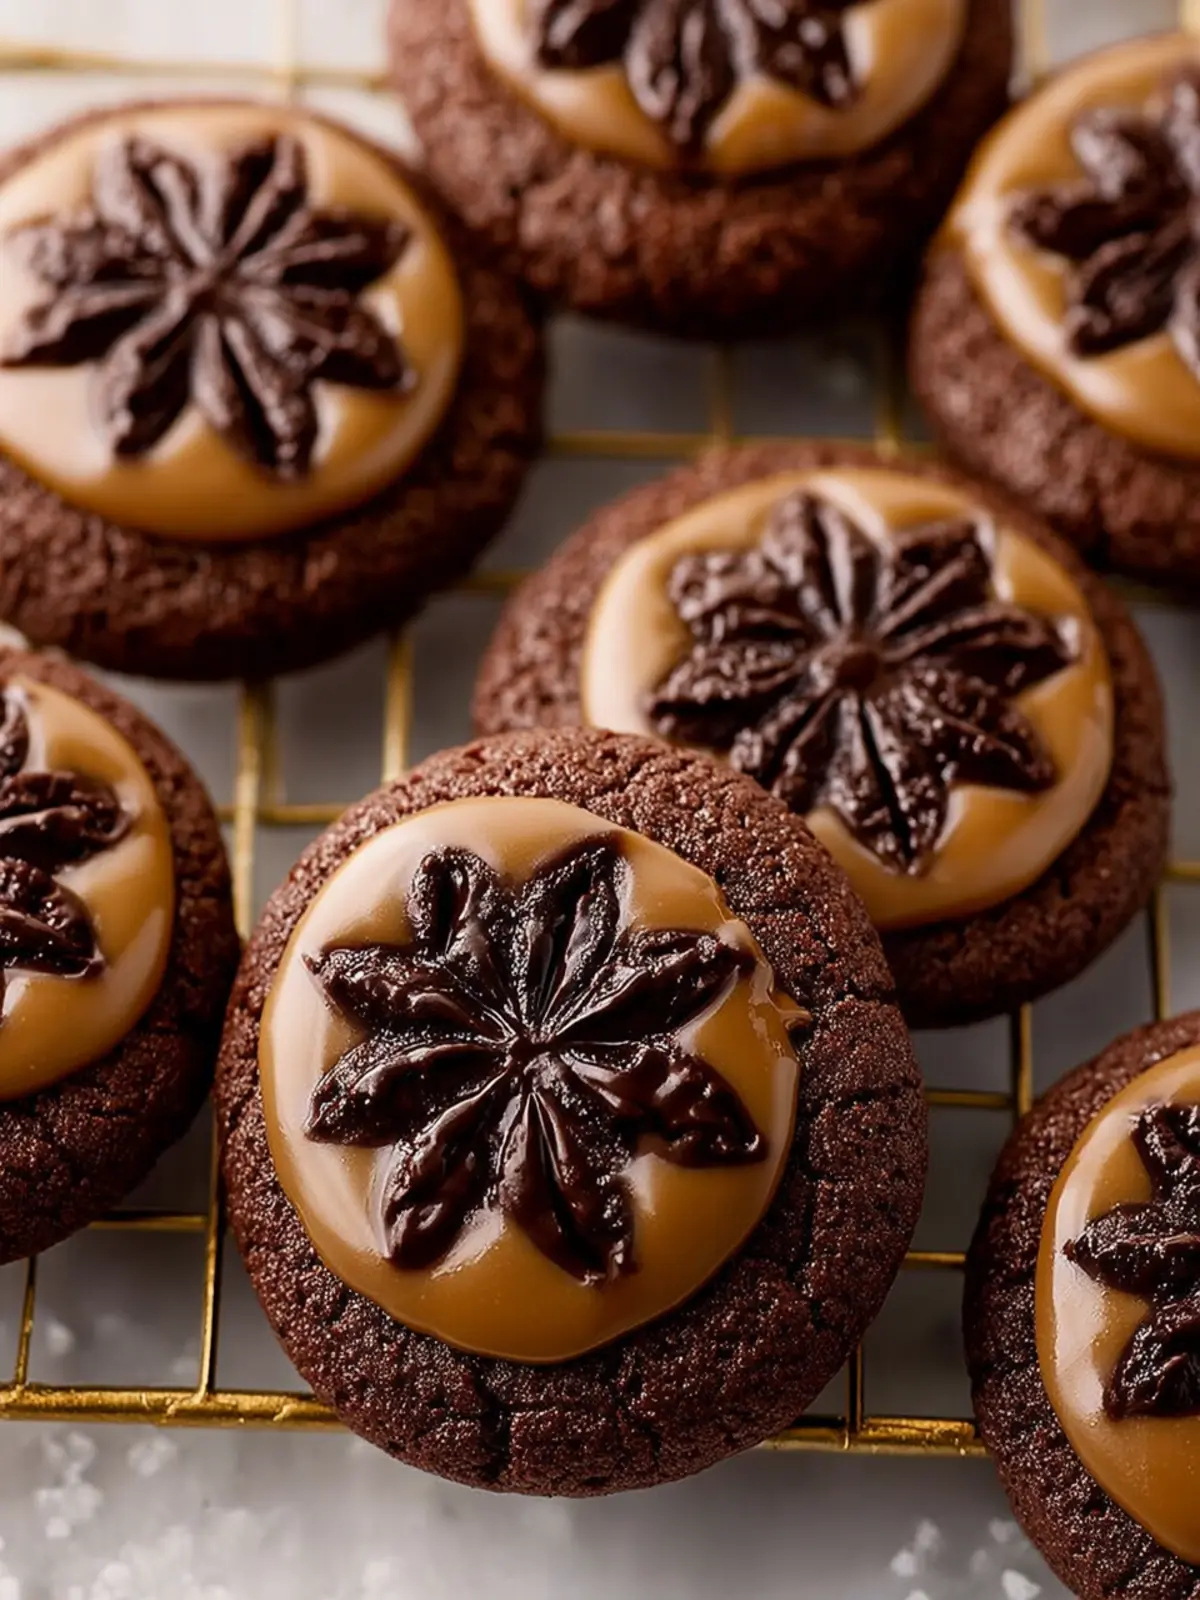
Imagine biting into a warm, decadent chocolate cookie, the rich flavors of espresso delightfully awakening your senses. That’s exactly what stamped chocolate espresso cookies offer—an extraordinary blend of cocoa and coffee that turns a humble cookie into a gourmet treat. This recipe is not just about dessert; it’s about creating memorable moments, whether shared with friends over a coffee date or savored quietly while indulging yourself after a long day.
What makes these cookies truly special is their unique presentation. The fun of stamping them adds a personal touch, making them ideal for gifts or festive occasions. They not only taste divine but also look stunning, catching the eye of anyone fortunate enough to come across them. As you stamp each cookie, you’re not just baking; you’re sharing a piece of your creativity and passion for culinary arts.
Furthermore, these cookies bridge the gap between casual snacking and sophisticated dessert. The infusion of espresso enhances the chocolate’s deep flavor, creating a nuanced experience that pairs beautifully with a cup of coffee or a chilled glass of milk. You’ll find yourself revisiting this recipe as it becomes a go-to for impromptu gatherings or a treat for yourself.
The preparation is straightforward, making it accessible for even novice bakers. With just a handful of ingredients—many of which you probably already have in your pantry—you can whip up a batch of stamped chocolate espresso cookies that will impress anyone who tries them.
What makes Stamped Chocolate Espresso Cookies a must-try?
- Flavor Profile: The combination of chocolate and espresso is irresistible. That perfect blend creates a cookie that is both rich and deeply flavorful.
- Visual Appeal: Stamping the cookies can elevate your baking game. They’re almost too pretty to eat!
- Easy to Make: The straightforward ingredients mean you’ll be enjoying freshly baked cookies in no time.
So, roll up your sleeves and get ready to treat yourself to a delightful cookie experience that’s sure to leave a lasting impression!
Key Ingredients for Stamped Chocolate Espresso Cookies
Baking stamped chocolate espresso cookies is an exciting adventure in flavors, perfectly combining the richness of chocolate and the boldness of espresso. Each ingredient plays a crucial role in crafting cookies that are not just a treat, but an experience.
-
Espresso Powder: The star of our show, espresso powder enhances the chocolate flavor while adding its own delightful depth. Opt for high-quality espresso powder for the richest taste.
-
Unsweetened Cocoa Powder: For that deep, chocolatey goodness, unsweetened cocoa powder is key. It gives the cookies their signature color and rich flavor without added sweetness.
-
Granulated Sugar and Brown Sugar: This duo creates the ideal texture! Granulated sugar helps the cookies spread, while brown sugar adds moisture and a touch of chewiness, making every bite irresistible.
-
Butter: Using softened unsalted butter gives our cookies a tender crumb. It’s also essential for creating that melt-in-your-mouth experience we all crave.
-
Eggs: To achieve the right balance of moisture and structure, I recommend using room temperature eggs. They incorporate more easily, leading to a smoother dough.
-
Flour: All-purpose flour is the foundation of these cookies. It provides the necessary structure to hold everything together.
-
Baking Soda and Salt: Baking soda helps the cookies rise and spread, while a pinch of salt enhances the flavors, making them richer and more balanced.
By gathering these simple yet essential ingredients, you’re not just making cookies; you’re setting the stage for a delightful baking session sure to impress friends and family alike!
Why You’ll Love Stamped Chocolate Espresso Cookies
The allure of stamped chocolate espresso cookies is not just in their rich flavor but also in the delightful story they weave with every bite. Imagine biting into a soft, chewy cookie, the robust espresso flavor dancing with rich chocolate, while a hint of sweetness lingers on your palate. These cookies are more than just a treat; they are an experience that brings warmth and comfort, making them perfect for cozy evenings or impromptu gatherings with friends.
Unforgettable Flavor Combination
The blend of chocolate and espresso is a match made in heaven. The deep, bold flavor of espresso elevates the buttery sweetness of the chocolate, creating a taste sensation that’s hard to resist. Plus, each cookie is stamped with fun designs, making them eye-catching and perfect for gifting or showcasing on your dessert table.
Perfect for Any Occasion
Whether you’re celebrating a holiday, hosting a game night, or simply craving a decadent snack, these cookies fit the bill. They are adaptable, fitting into any scenario while providing a sophisticated yet approachable treat that is sure to impress your guests.
Everyone Can Join In
These cookies are beginner-friendly, inviting both novice bakers and seasoned pros to join in the fun. So gather your friends, pour a cup of coffee, and enjoy the delightful process of creating stamped chocolate espresso cookies that you’ll cherish long after the last crumb has disappeared.
Variations for Stamped Chocolate Espresso Cookies
Exploring variations for stamped chocolate espresso cookies is like discovering new worlds of flavor and texture. Each twist adds a unique charm to this beloved treat. Here are some creative ideas to inspire your baking adventures:
Flavor Infusions:
- Nutty Variations: Incorporate finely chopped nuts, such as hazelnuts or almonds, to add a delightful crunch. Toasting the nuts beforehand enhances their flavor dramatically.
- Spices: A dash of cinnamon or freshly grated nutmeg can elevate the chocolate and espresso notes. These spices create warmth, perfect for cozy evenings.
Mix-Ins and Extras:
- Chocolate Chips: Fold in some semi-sweet or dark chocolate chips for an extra melty experience with every bite.
- Dried Fruit: Add cranberries or cherries to bring a touch of tartness that balances the rich chocolate.
Vegan Alternatives:
Consider using aquafaba instead of eggs and coconut oil or vegan butter in place of regular butter for a delicious vegan version of your stamped chocolate espresso cookies. These variations not only cater to different dietary preferences but also introduce new textures that can make your cookies even more enjoyable.
Cooking Tips and Notes for Stamped Chocolate Espresso Cookies
When baking these stamped chocolate espresso cookies, it’s all about enhancing the rich flavors and achieving the perfect texture. Here are some tips to ensure that your cookies turn out delightfully delicious every time.
Choosing Your Chocolate
Using high-quality chocolate makes a noticeable difference in your cookies. Opt for dark chocolate chips or chunks with at least 60% cocoa content to balance the espresso’s bitterness. If you’re feeling adventurous, try incorporating chocolate-covered espresso beans for added crunch and flavor.
The Importance of Proper Measurements
Accurate ingredient measurements are essential for baking success. I always recommend using a kitchen scale for precision, especially with flour and sugar. Too much flour can lead to dry cookies, while too little can result in cookies that spread too much.
Chill to Perfection
Chilling the dough for at least 30 minutes before baking helps to firm it up, preventing excessive spreading. This is particularly important if you’re planning to stamp your cookies – a firmer dough holds its shape better and gives those designs a chance to shine.
Watch Those Baking Times
Every oven is a bit different, so keep an eye on your cookies during baking. The edges should look set while the centers remain soft. They will firm up as they cool, giving you the perfect chewy texture.
Experiment with Stamps
Don’t hesitate to get creative with your stamping technique! Simple designs can make a huge impact. Let your personality shine through the cookies for a fun touch that guests will love.
Happy baking!
Serving Suggestions for Stamped Chocolate Espresso Cookies
There’s something truly delightful about enjoying freshly baked stamped chocolate espresso cookies. They not only make a great indulgence on their own but also pair beautifully with various accompaniments. To elevate your cookie experience, consider these serving suggestions.
With a Coffee or Espresso
What better way to enjoy these cookies than alongside a steaming cup of coffee or a rich espresso? The robust flavors of the espresso in the cookies harmonize perfectly with your favorite brew, enhancing each bite.
Ice Cream Sandwiches
Transform your stamped chocolate espresso cookies into indulgent ice cream sandwiches. Simply place a scoop of vanilla or coffee-flavored ice cream between two cookies. This combination offers a delicious contrast of warm and cold textures, making it a delightful treat.
Platter Presentation
If you’re hosting a gathering, arrange your cookies on a decorative platter with fresh fruit or nuts. This colorful display not only looks inviting but also adds a fresh element to the dessert spread.
Sweet Treat Favors
Consider packaging individual cookies in clear cellophane bags tied with a ribbon as sweet treats for guests at events like weddings or baby showers. This personal touch adds a thoughtful element to any celebration.
By embracing these serving suggestions, your stamped chocolate espresso cookies become more than just a simple dessert; they transform into memorable experiences!
Time Breakdown for Stamped Chocolate Espresso Cookies
Making the perfect stamped chocolate espresso cookies not only tantalizes your taste buds but also requires a bit of time management in the kitchen. Here’s a quick breakdown to help you plan.
Preparation Time
Getting ready to make stamped chocolate espresso cookies takes about 15 minutes. This includes measuring out your ingredients and mixing them until you achieve the perfect dough consistency.
Chilling Time
After preparing the dough, you’ll want to chill it for approximately 30 minutes. This step is crucial for enhancing the flavors and ensuring your cookies hold their shape while baking.
Baking Time
The baking itself is quick, only about 10-12 minutes per batch. Keep an eye on them, as you want that perfect balance between soft centers and crisp edges.
Total Time
In total, expect to spend around 55-57 minutes from start to finish. Trust me, the delicious aroma and taste are well worth this little investment of time!
Nutritional Facts for Stamped Chocolate Espresso Cookies
These stamped chocolate espresso cookies are not only delicious but can also fit nicely into your balanced diet. Let’s take a closer look at some of their nutritional benefits.
Calories
A serving of these delightful cookies contains approximately 120 calories. While they are an indulgent treat, they can easily satisfy your sweet tooth without wrecking your daily caloric intake.
Protein
Each cookie boasts about 2 grams of protein. Though not a substantial source, this protein contributes to your overall intake, making them a satisfying afternoon snack that pairs nicely with coffee.
Sugar
With around 8 grams of sugar per cookie, these stamped chocolate espresso cookies offer just the right amount of sweetness. This makes them a delightful pick-me-up when you need a little boost during your busy day. Enjoy them in moderation, and they can be part of a balanced treat!
FAQ About Stamped Chocolate Espresso Cookies
Creating the perfect batch of stamped chocolate espresso cookies can bring about a few questions, especially for those looking to customize or preserve their delightful cookies. Here are some of the most frequently asked questions to help you bake with confidence.
Can I make these cookies gluten-free?
Absolutely! To easily convert your stamped chocolate espresso cookies into a gluten-free treat, simply replace the all-purpose flour with a 1:1 gluten-free flour blend. Make sure to choose a blend that includes xanthan gum to help with the texture and hold. I’ve baked this way multiple times and found that most blends work beautifully.
How can I store leftover Stamped Chocolate Espresso Cookies?
To keep your stamped chocolate espresso cookies fresh, store them in an airtight container at room temperature. They can also be frozen for extended storage; just place them in a freezer bag with as much air removed as possible. When you’re ready to enjoy them again, let them thaw at room temperature or pop them in the microwave for a few seconds to regain that fresh-baked goodness.
What’s the best way to ensure my cookies don’t spread too much?
To prevent your cookies from spreading excessively during baking, make sure to chill the dough for at least 30 minutes before baking. This helps solidify the fats, resulting in a thicker cookie. Another tip is to use parchment paper on your baking sheet, which can also help them hold their shape.
Can I add nuts or chocolate chips to the recipe?
Definitely! Adding nuts like walnuts or chocolate chips can elevate your stamped chocolate espresso cookies. Just be cautious with the amount; a half-cup of either will do nicely without compromising the dough’s balance. The variations can lead to fun surprises with every bite!
These tips should help you achieve cookie perfection, whether you’re following the recipe closely or venturing into creative territory!
Conclusion on Stamped Chocolate Espresso Cookies
In wrapping up our journey through the delightful world of stamped chocolate espresso cookies, you’ll find that these treats are not merely cookies; they’re bursts of flavor that resonate with every bite. The rich chocolate, combined with the robust espresso, creates a harmonious balance that truly satisfies.
These cookies are perfect for sharing at gatherings or enjoying with a cozy cup of coffee at home. Remember, the beauty lies in the details: from the precise measurements of ingredients to the gentle stamping that adds a personal touch. So whether you’re baking for loved ones or indulging yourself, these cookies are sure to become a cherished favorite in your dessert repertoire.
Print
Chocolate Espresso Cookies
- Total Time: 1 hour 33 minutes
- Yield: 24 cookies 1x
- Diet: Vegetarian
Description
Delicious chocolate cookies infused with espresso flavor, perfect for any occasion.
Ingredients
Scale
- 1 and 1/2 cups (188g) all-purpose flour (spooned & leveled)
- 3/4 cup (62g) unsweetened natural or Dutch-process cocoa powder, plus more as needed
- 2 teaspoons espresso powder
- 1 teaspoon baking powder
- 1/8 teaspoon salt
- 3/4 cup (12 Tbsp; 170g) unsalted butter, softened to room temperature
- 1 cup (200g) granulated sugar
- 1 large egg, at room temperature
- 1 teaspoon pure vanilla extract
- 1 teaspoon espresso powder
- 2 Tablespoons (30g/ml) warm water
- 1 and 1/2 cups (180g) confectioners’ sugar, sifted
- 2 Tablespoons (30g/ml) milk (dairy or nondairy)
Instructions
- In a medium bowl, whisk together the flour, cocoa powder, espresso powder, baking powder, and salt. Set aside.
- In a large bowl using a handheld or a stand mixer fitted with a paddle attachment, beat the butter and sugar together on medium-high speed until smooth and creamy, about 3 minutes. Add the egg and vanilla and beat on medium-high speed until combined, about 1 minute. Scrape down the sides and bottom of the bowl and beat again as needed to combine.
- Add the dry ingredients to the wet ingredients and mix on low speed until combined. The dough will be soft and sticky. Cover the bowl tightly and refrigerate for at least 1 hour and up to 2 days.
- Line large baking sheets with parchment paper or silicone baking mats. Scoop a heaping tablespoon (about 30g) of chilled cookie dough per cookie and roll into balls. Arrange dough balls 3 inches apart on the prepared baking sheets.
- Place the cookie stamp directly on top of each cookie dough ball, centering it as best as you can, then firmly press down until the dough extends nearly to the edges of the cookie stamp. Lift straight up. If your cookie dough is sticking to the cookie stamp, use a pastry brush to lightly brush cocoa powder on the stamp before stamping the cookie dough ball. You can then brush the excess cocoa powder off the tops of the stamped cookies, if desired.
- Chill the stamped cookies in the refrigerator for 1 hour before baking.
- Preheat the oven to 350°F (177°C).
- Bake the cookies until the edges are set, about 11–13 minutes. Remove from the oven and allow the cookies to cool on the baking sheet for 5 minutes before transferring to a cooling rack to cool completely.
- Using a fork or small whisk, mix the espresso powder and warm water together in a medium bowl until dissolved. Whisk in the confectioners’ sugar and milk/cream. For thinner glaze, whisk in more milk. For thicker glaze, whisk in more confectioners’ sugar.
- Using a pastry brush, brush the glaze on top of the cookies (or you can dip the tops of the cookies in the glaze). The glaze sets on the cookies in about 1 hour.
- Cover leftover cookies tightly and store at room temperature for up to 1 week.
Notes
- This recipe can be made in advance and stored in the refrigerator for up to 2 days before baking.
- For a richer chocolate flavor, use Dutch-process cocoa powder.
- Adjust the glaze consistency based on personal preference.
- Prep Time: 20 minutes
- Cook Time: 13 minutes
- Category: Dessert
- Method: Baking
- Cuisine: American
Nutrition
- Serving Size: 1 cookie
- Calories: 150
- Sugar: 12g
- Sodium: 50mg
- Fat: 7g
- Saturated Fat: 4g
- Unsaturated Fat: 2g
- Trans Fat: 0g
- Carbohydrates: 19g
- Fiber: 1g
- Protein: 2g
- Cholesterol: 30mg